Debugging is an important skill for any programmer, it enables you to better identify and fix errors in your code. In C++, debugging can be done most effectively using a debugger tool, such as gdb or the an IDE Debugger (such as the one built-in to Visual Studio Code). This tutorial will cover the basics of debugging C++ programs.
§1 Debugging Vernacular #
When debugging C++ programs, it’s essential to be familiar with the common terminology used in the debugging process. Understanding these terms will help you to communicate effectively about debugging.
§1.1 Breakpoints #
A breakpoint is a marker set in the code that tells the debugger to pause execution at that specific line.
- Used to inspect the state of the program at a particular point. It allows you to examine variable values, program flow, and logic.
§1.2 Watchpoints #
A watchpoint is similar to a breakpoint but is triggered when the value of a variable changes.
- Useful for debugging problems caused by unexpected changes to variables.
§1.3 Stepping #
Stepping refers to the process of executing your program line by line.
Types:
- Step Over (next): Executes the current line and moves to the next, skipping over function calls.
- Step Into (step): Moves into the function calls to see how they execute.
- Step Out (finish): Runs the rest of the current function and pauses once control returns to the calling function.
§1.4 Call Stack #
The call stack is a list of all the active functions or procedures that have been called to reach the current point of execution.
- It helps you understand the sequence of function calls that led to the current state.
§1.5 Frames #
A frame is a specific context in the call stack, corresponding to a single function call. A recursive function will have many frames.
- You can switch between frames to inspect the state (variables, arguments, etc.) of different functions in the call stack.
§1.6 Variables Inspection #
Viewing the values of variables at a breakpoint or during program execution.
- Helps you verify the values stored in variables and identify logical errors.
§1.7 Conditional Breakpoints #
A breakpoint that only pauses the program execution when a specific condition is met.
- Useful for stopping execution only when certain criteria are met, reducing the need for manual inspection.
§1.8 Core Dumps #
A core dump is a file that captures the memory of a program at a specific point, usually after a crash.
- Analyzing core dumps can help you determine why a program crashed, or have insight on the state of the program at the moment the core dump was captured.
§1.9 Segmentation Fault (Segfault) #
A segmentation fault occurs when a program tries to access a memory location that it’s not allowed to.
- Commonly caused by dereferencing null or invalid pointers.
Use a debugger to locate the exact point of failure and inspect pointer usage.
§1.10 Assertions #
Assertions are checks within the code that, when false, terminate the program and display an error message.
- Helps catch unexpected states or values during development.
§2 GDB #
The most common C++ debugger is GDB, a terminal-based debugger that is ubiquitous and comes bundled with the g++ toolset.
There are many excellent tutorials and lectures which teach GDB, such as:
- https://www.incredibuild.com/blog/a-step-by-step-crash-course-in-c-debugging-without-ide
- https://www.cs.umd.edu/~srhuang/teaching/cmsc212/gdb-tutorial-handout.pdf
For this assignment, we will utilize modern visual debuggers, which are much easier to use.
§3 Visual Studio (Windows) & Xcode (macOS) Debuggers #
I will be demonstrating how to use the Visual Studio Code debugger, but most of the same techniques and processes will also apply to other IDE debuggers.
- Windows Visual Studio Debugger Guide: https://learn.microsoft.com/en-us/visualstudio/debugger/getting-started-with-the-debugger-cpp?view=vs-2022
- macOS Xcode Debugger Guide: https://developer.apple.com/documentation/xcode/stepping-through-code-and-inspecting-variables-to-isolate-bugs
- Visual Studio Code Debugger Guide: https://code.visualstudio.com/docs/cpp/cpp-debug
§4 VS Code Debugger Setup #
If you are not using Visual Studio Code, you may skip to the Using A Visual C++ Debugger section.
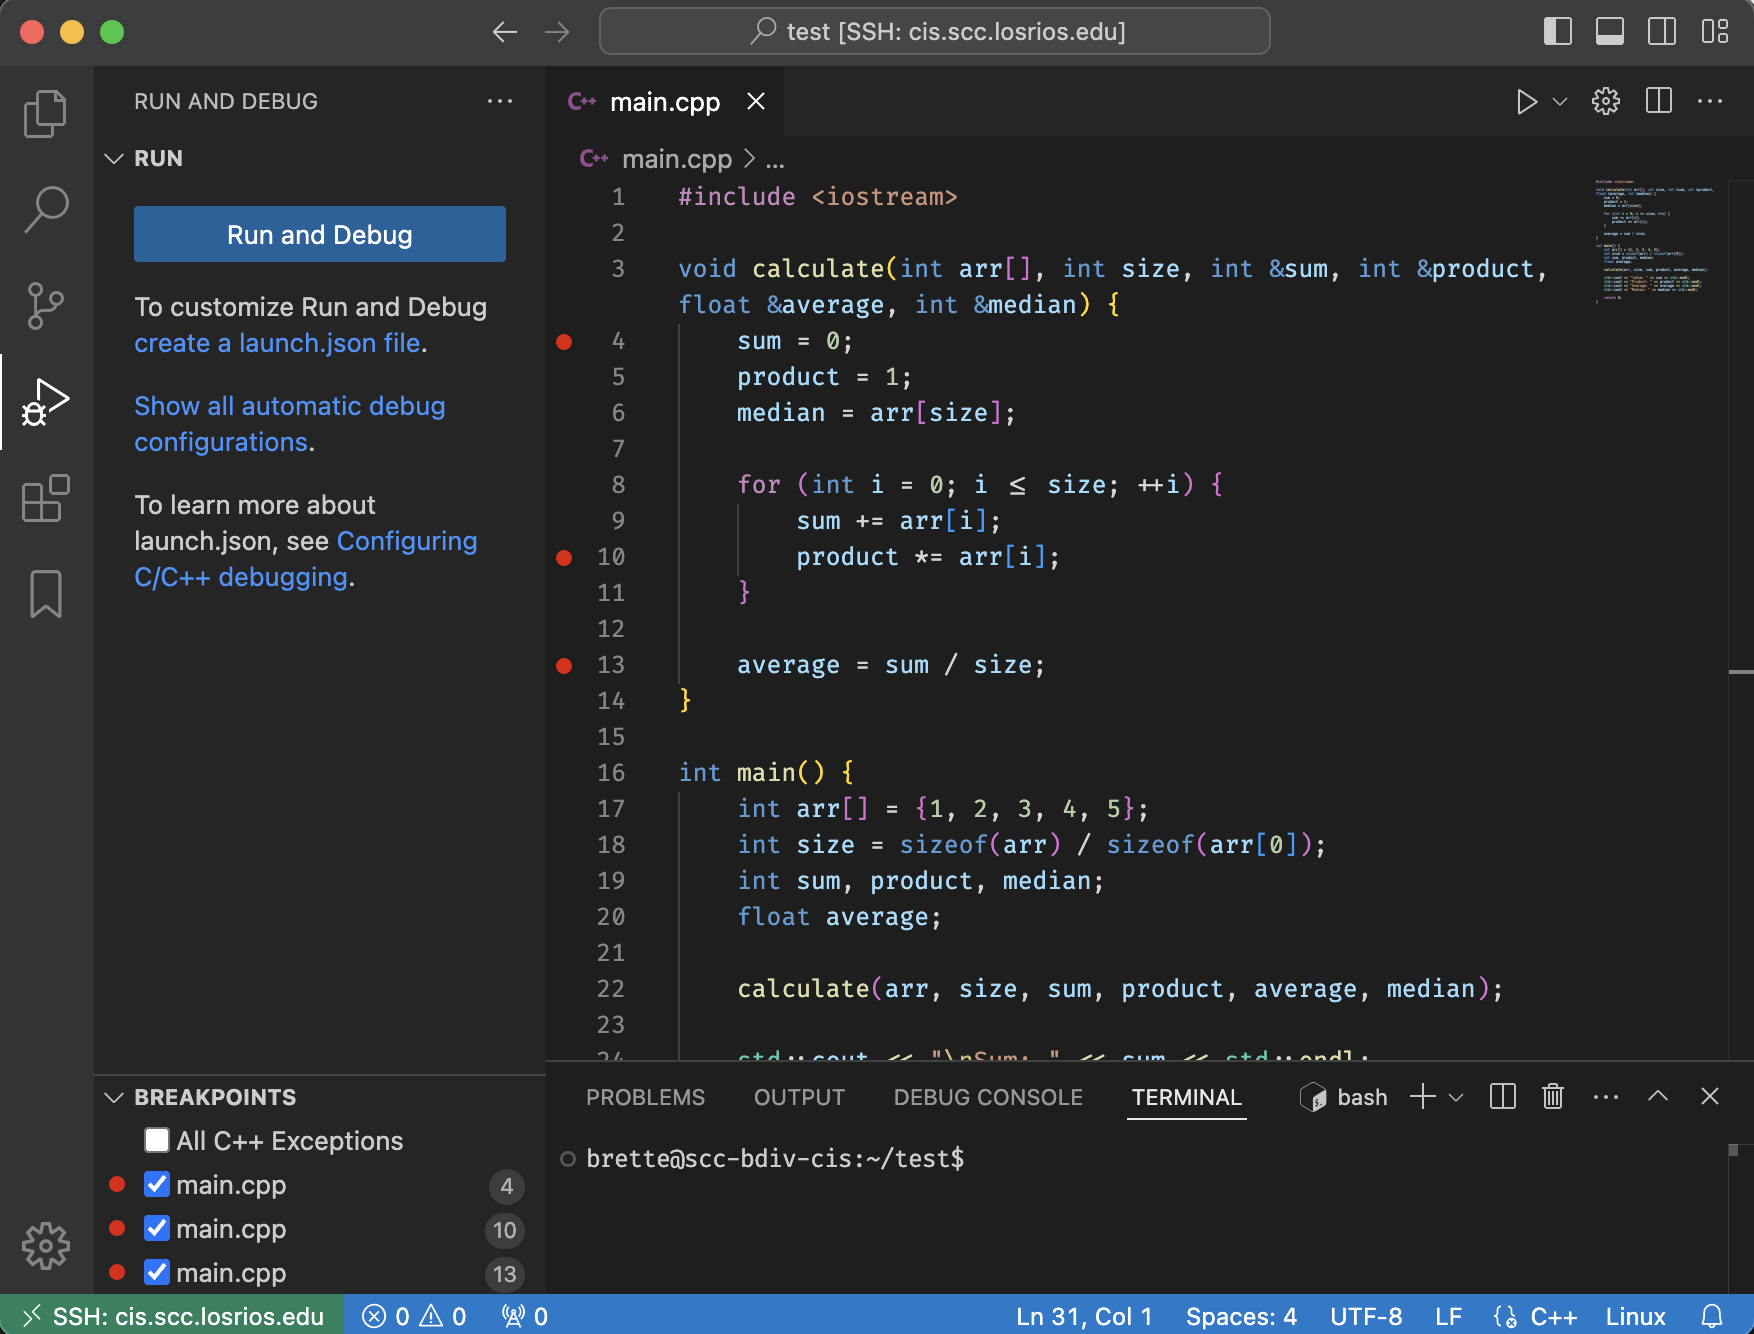
When you open a C++ file in visual studio code, you should see two debugging options appear in the interface:
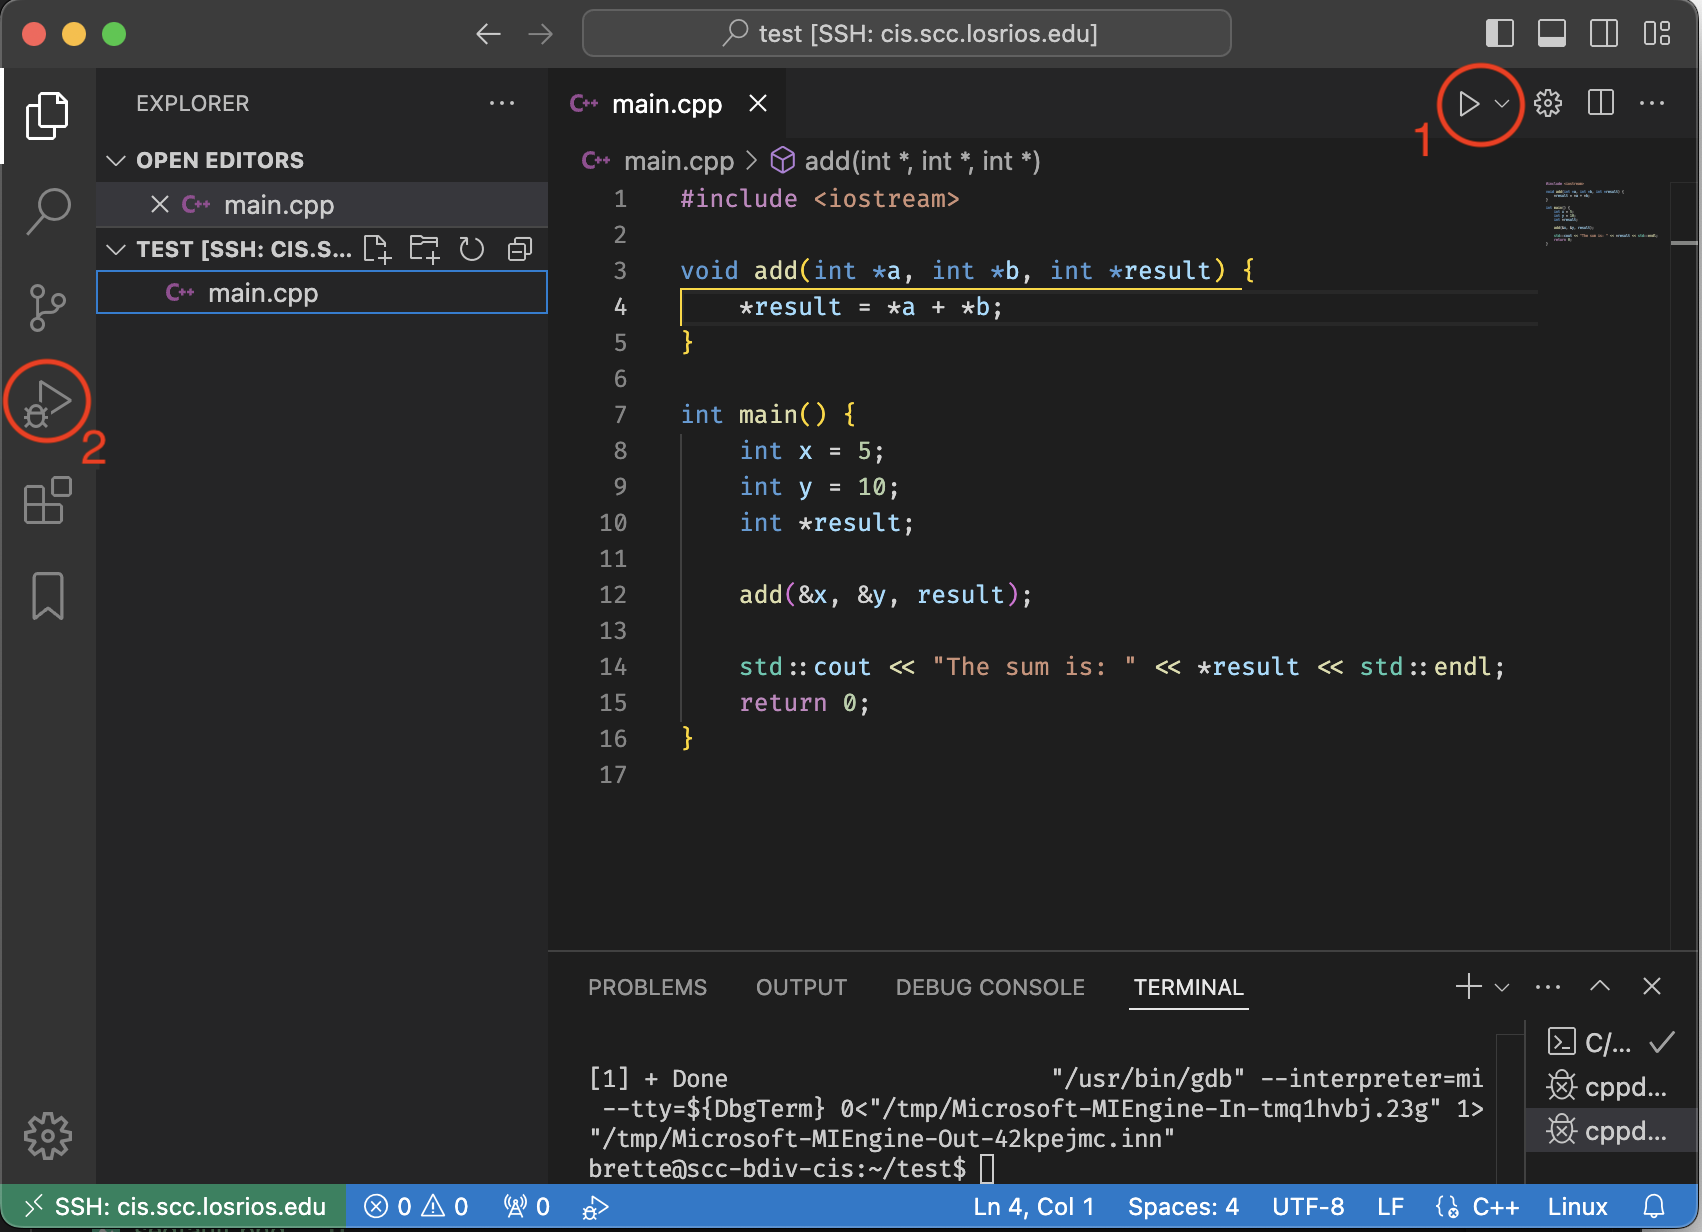
VS Code interface with C++ file open
- 1. is the C++ extension
runicon. - 2. is the native VS Code debugging sidebar
Both options can be used to run the debugger, for now, always use the #2 option on the far left side, This will open the debug menu.
Once the debug menu is open, you will be able to run your C++ program in debug mode by clicking the blue “Run and Debug” button:
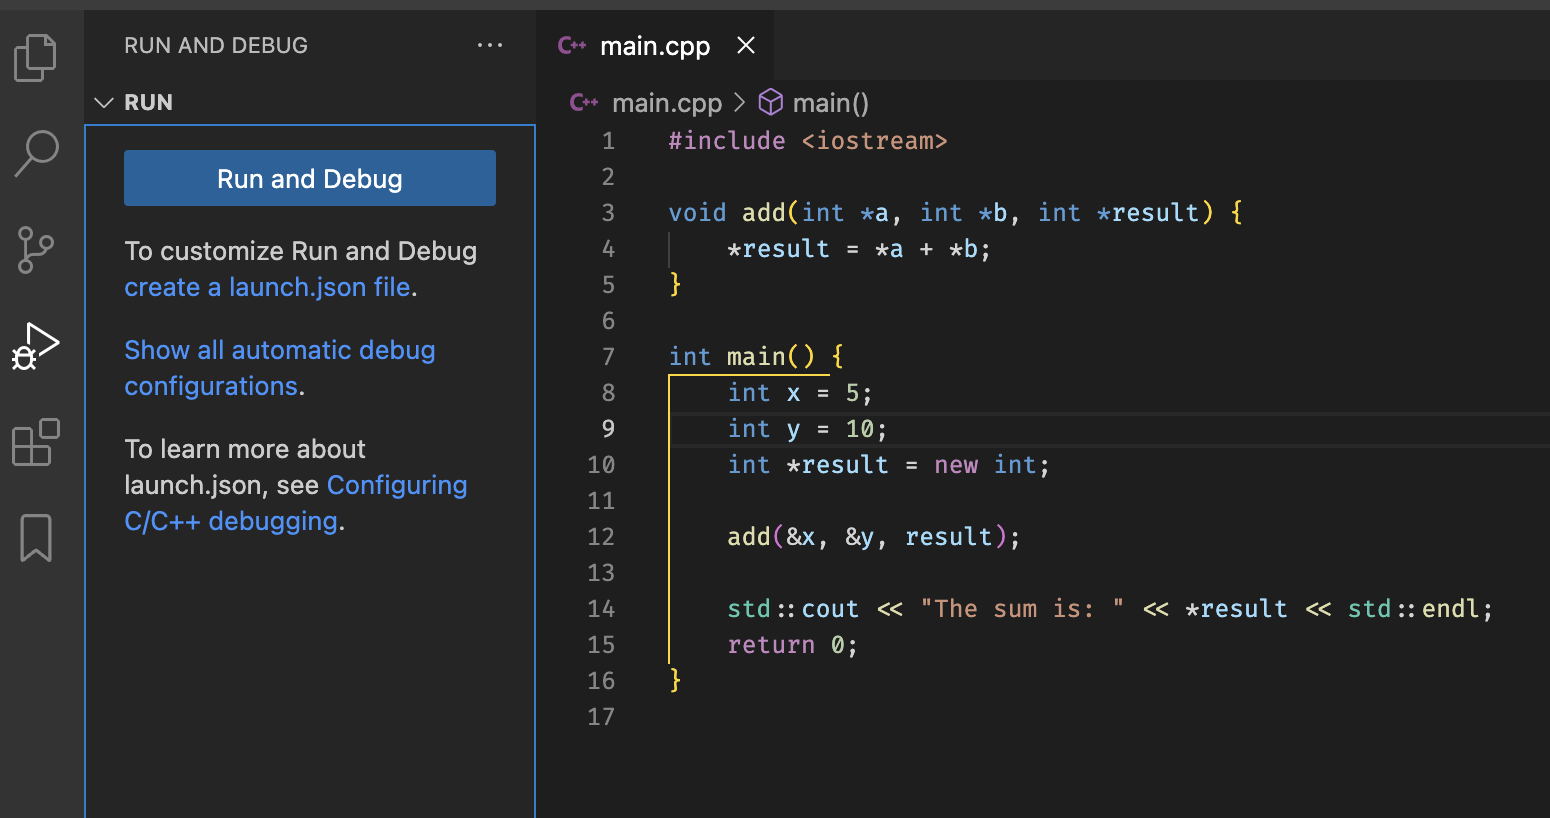
Run and Debug sidebar
Your assignment repos are all pre-configured with a working debug configuration file, located in .vscode/tasks.json.
§5 Using A Visual C++ Debugger #
§5.1 Debugging Segmentation Faults #
If you are working with pointers, it’s common to run into segmentation faults due to incorrect memory access. A debugger can help you find the source of the issue.
Consider this example code (this is 1.cpp from the assignment files):
#include <iostream>

void add(int *a, int *b, int *result) {
  *result = *a + *b;
}

int main() {
  int x = 5, y = 10;
  int *result = nullptr;

  add(&x, &y, result);

  std::cout << "The sum is: " << *result << std::endl;
}
This happens when this code is run:
$ g++ 1.cpp -o test1
$ ./test1
Segmentation fault (core dumped)
Which does not provide much information about what went wrong…
Let’s use a debugger to narrow down where this code is failing. If we run this code again using the “Run and Debug” option:
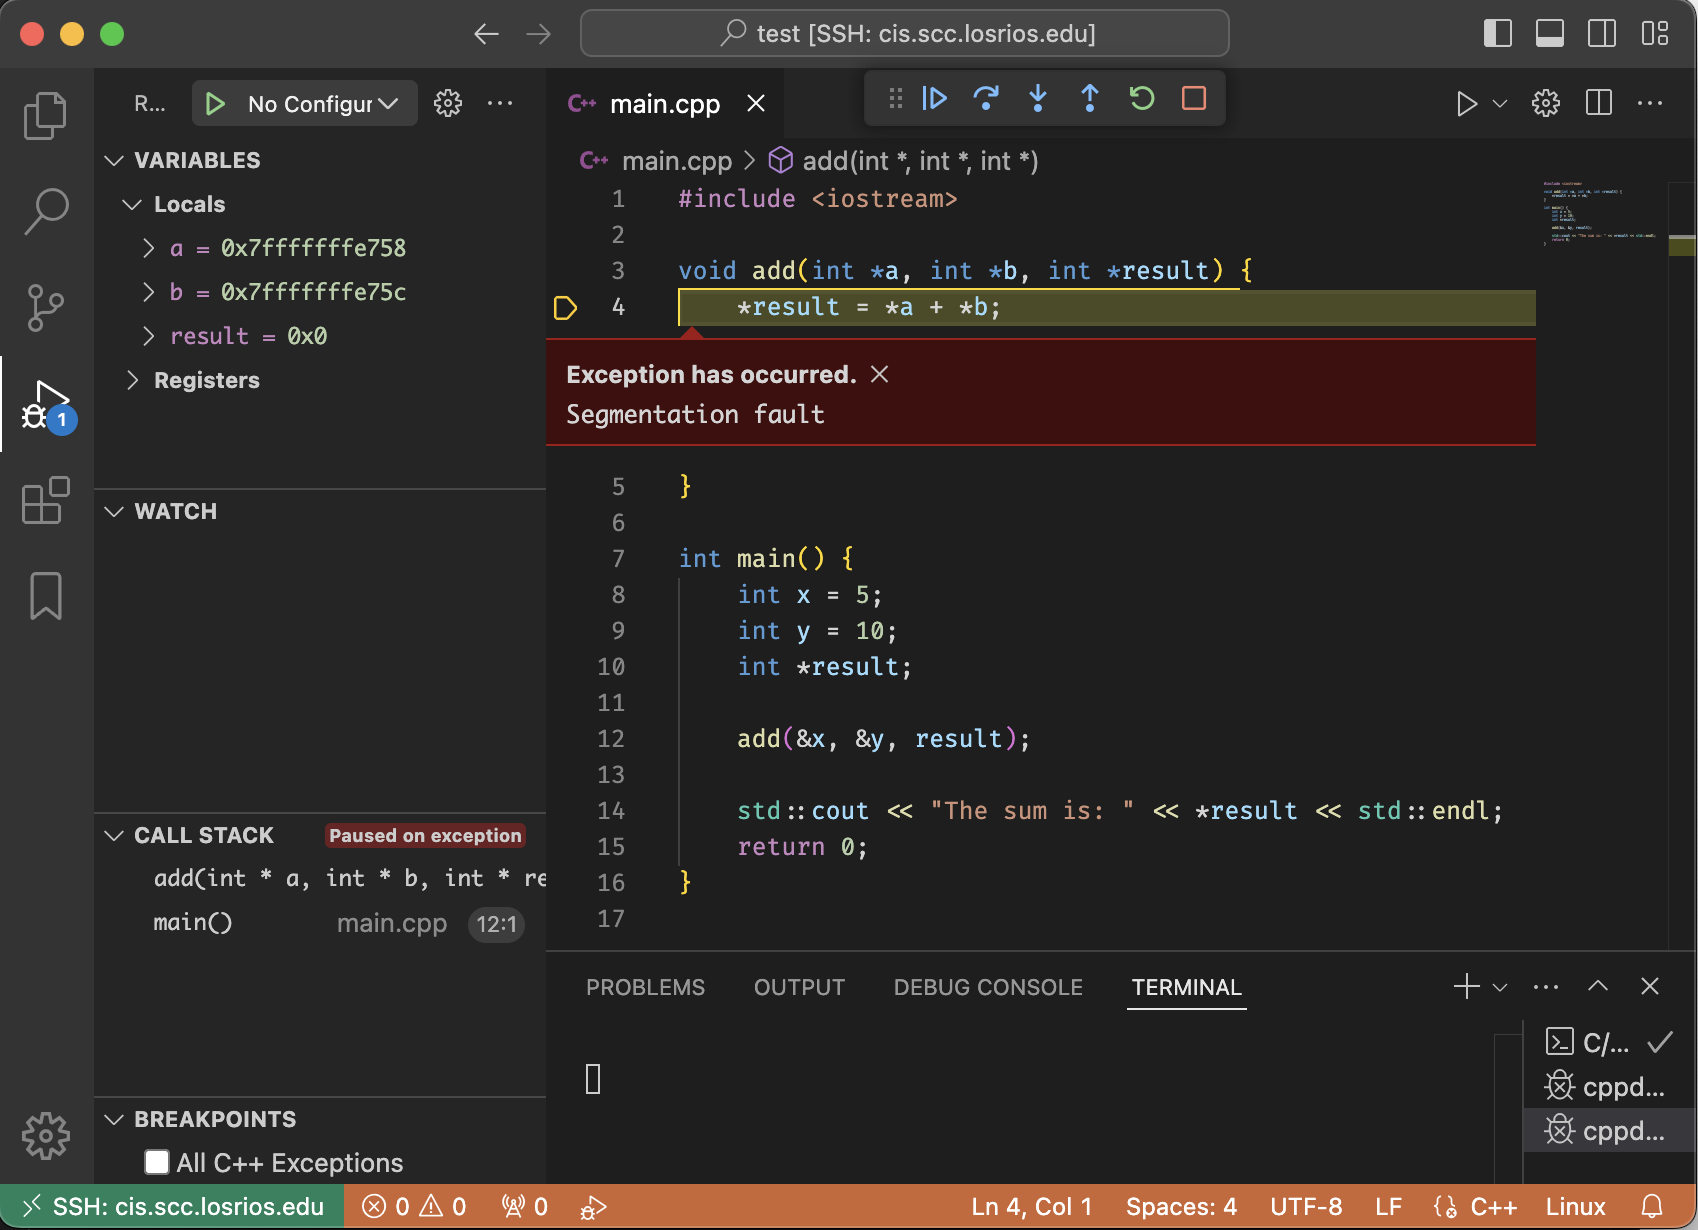
Debugger paused at segfault
Immediately we see that one of the variables on line 4 are invalid. Since all of these variables are pointers (e.g. contain memory addresses), we would expect all three to point to some valid memory. Let’s inspect the variable values in the “local variable” window on the top left:
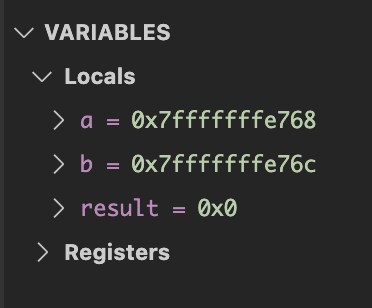
Local variables window showing nullptr
As we can see, the result variable is a nullptr, pointing to address 0x0. So this means that this variable was likely not initialized correctly.
Looking at the code again, we can see the declaration for the result pointer does not allocate any memory.
#include <iostream>

void add(int *a, int *b, int *result) {
  *result = *a + *b;
}

int main() {
  int x = 5, y = 10;
  int *result = nullptr;  // incorrectly declared as a nullptr.
  // should be initialized: `int *result = new int;`

  add(&x, &y, result);

  std::cout << "The sum is: " << *result << std::endl;
}
After fixing the code, the program is able to run correctly:
$ g++ 1.cpp -o test1
$ ./test1
The sum is: 15
§5.2 Inspecting Variables with Breakpoints #
Another common use case for debuggers is understanding the current values of variables as the code progresses.
Take this example code (this is a shorter version of 2.cpp from the assignment files):
#include <iostream>

void calculate(int arr[], int size, int &sum, int &product, float &average, int &median) {
  sum = 0;
  product = 1;
  median = arr[size];

  for (int i = 0; i <= size; ++i) {
    sum += arr[i];
    product *= arr[i];
  }

  average = sum / size;
}

int main() {
  int arr[] = {1, 2, 3, 4, 5};
  int size = sizeof(arr) / sizeof(arr[0]);
  int sum, product, median;
  float average;

  calculate(arr, size, sum, product, average, median);

  std::cout << "\nSum: " << sum << std::endl;
  std::cout << "Product: " << product << std::endl;
  std::cout << "Average: " << average << std::endl;
  std::cout << "Median: " << median << std::endl;
}
This is the output we get, something is off:
$ g++ 2.cpp -o test2
$ ./test2
Sum: 30875          // should be: 15
Product: 3703200    // should be: 120
Average: 6175       // should be: 3
Median: 30860       // should be: 3
what is going on here‽
Let’s add some breakpoints so we can halt the code and understand what is happening.
You can set breakpoints by clicking on the space between the line number and the code, this will place a red “stop” icon. You can place as many breakpoints in your code as you want. I will place 3:
Breakpoints set in the code editor
You can see a list of all breakpoints in the “Breakpoints” view on the bottom left. Here you can enable or disable breakpoints, jump to them in the code, or delete them. You can also delete breakpoints by clicking on the red icon again in the code editor window.
Let’s start a debugging session by clicking on “Run and Debug”:
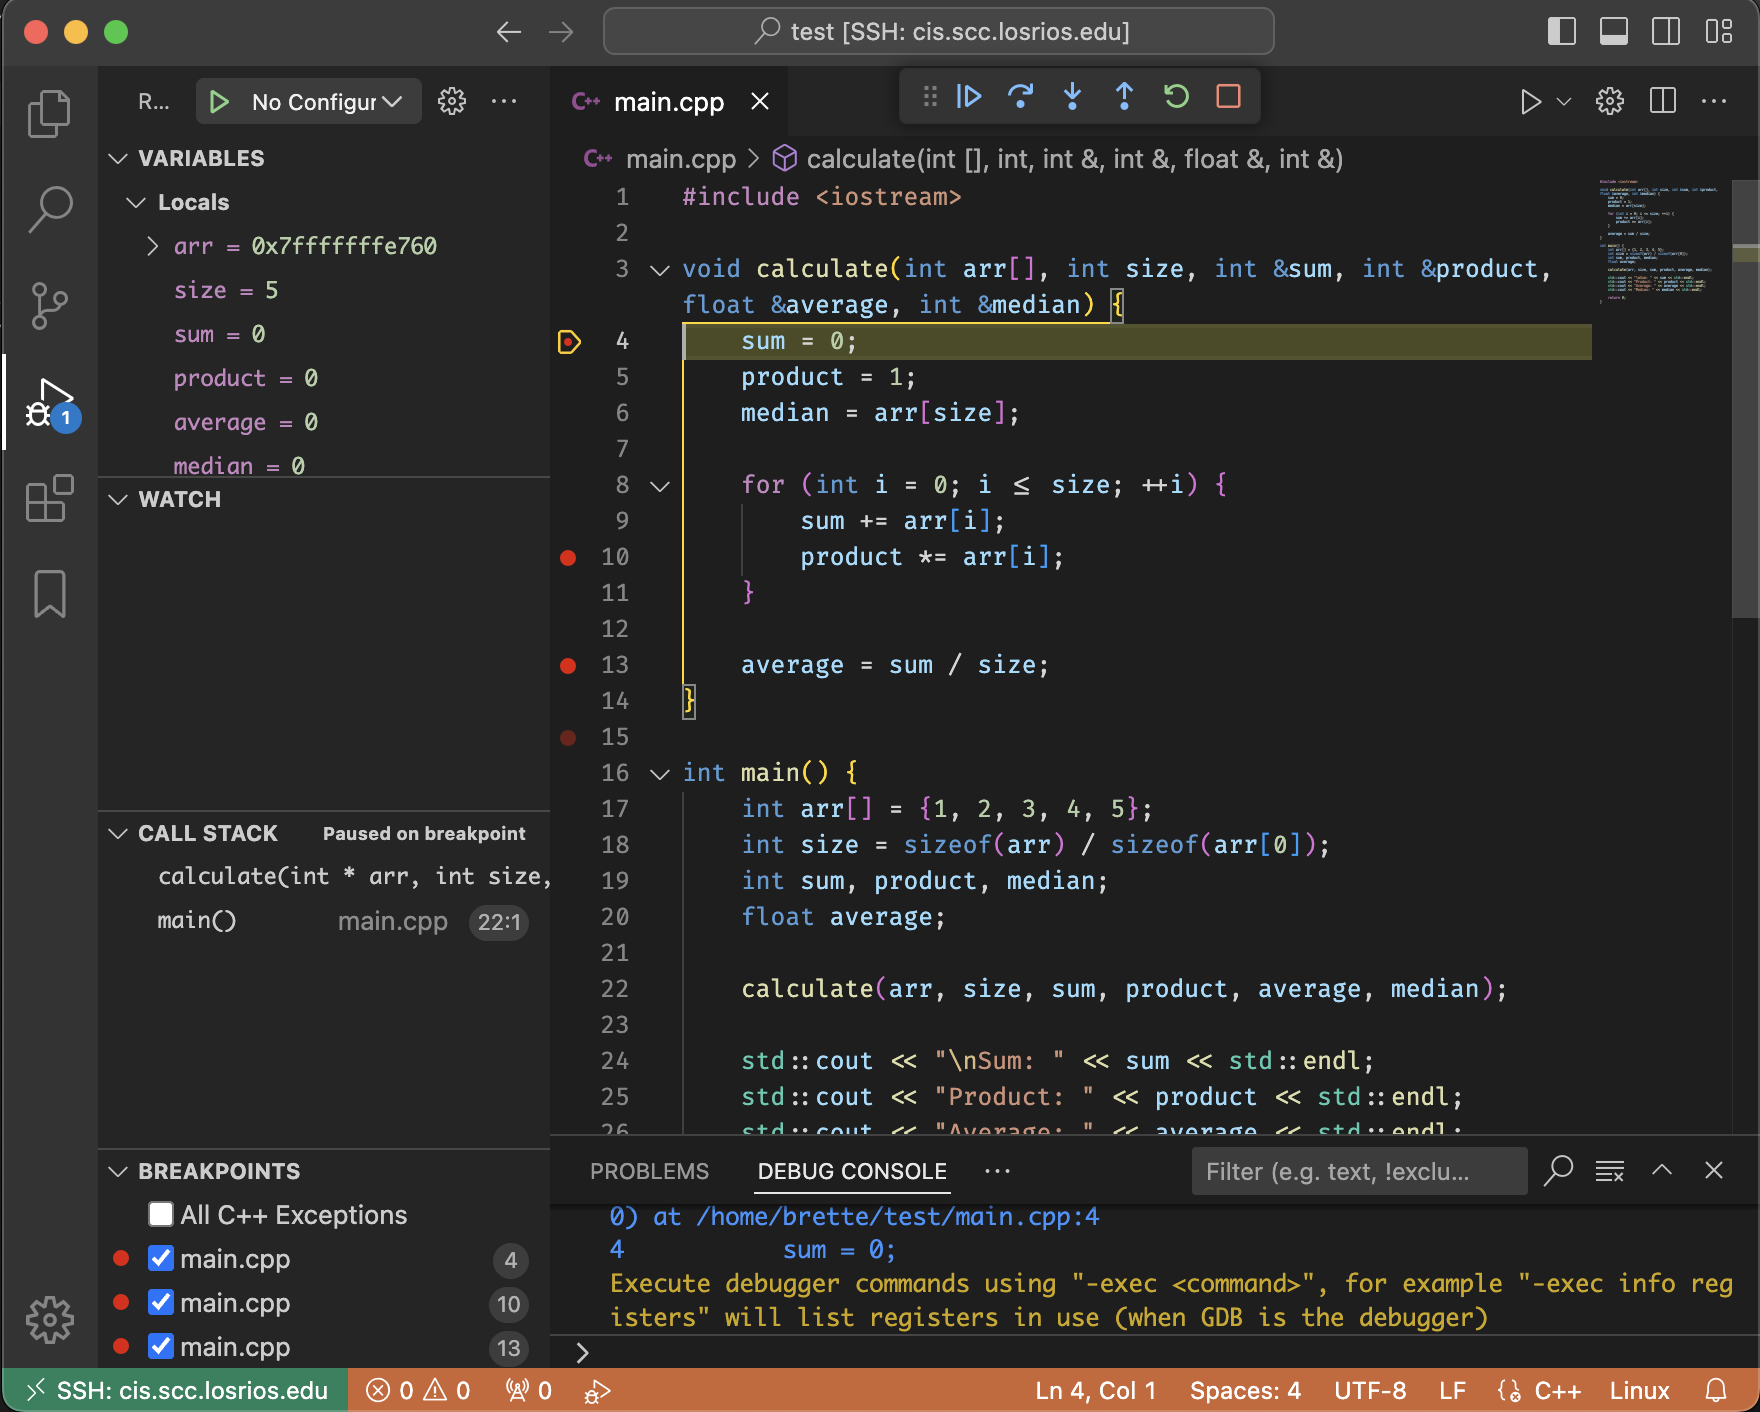
Debugger paused at breakpoint
As you can see, the code halted at the first breakpoint that gets executed. Now we can see the current contents of all variables, and the contents of the call stack. Currently, the call stack contains only the main() function and the calculate() function. In a recursive function, the call stack will have many entries. We can also see the values of all local variables. Currently, all variables are uninitialized other than the arr pointer and the size variable.
Let’s continue on to the next breakpoint by clicking on the “Continue” button:

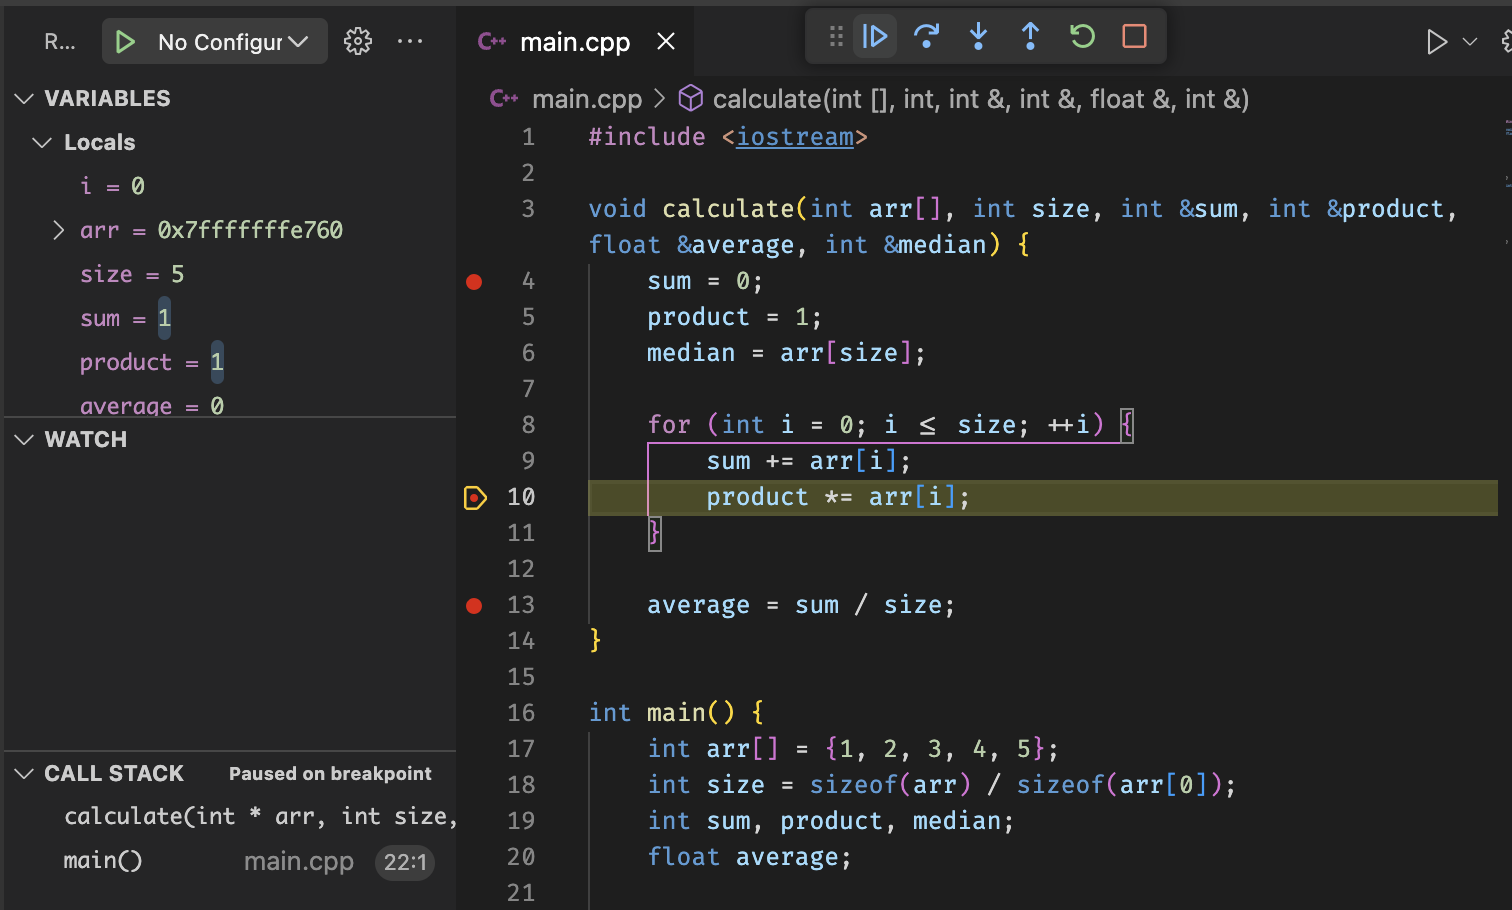
The code continued running until the next breakpoint. Now we can see a few variables have updated. We can continue running the code and analyzing the variables until we determine the source of the bug.
I’ll leave resolving the actual bug for you to complete, as part of the assignment.
§5.3 Stepping Through Code #
When you stop your code with a breakpoint, you have several options for how to step through your code.

Stepping controls in VS Code debugger
Pictured from left to right: Continue, Step Over, Step Into, Step Out, Restart, Stop Debugging.
- Continue: Resume normal program/script execution (until the next breakpoint)
- Step Over: Execute the next method as a single command, without inspecting or following its component steps
- Step Into: Enter the next method or function to follow its execution line-by-line
- Step Out: When inside a method or subroutine, return to the earlier execution context. By completing all remaining lines of the current method
- Restart: Terminate the current program and start a new debugging session
- Stop Debugging: Terminate the current program and debug session
You can use these commands to step through your code in various ways. Generally, you will want to use the Continue and Step Over commands when debugging code. Step Into/Out are useful when attempting to understand what is happening within function calls.